The kitchen island always starts out clean. Then real life happens.
A backpack lands on the corner. Mail slides in. A mug sits down for a second and stays there all day. By dinner, the island looks like a random pile that nobody meant to make.
If that sounds familiar, these Kitchen Island Styling Ideas are for you. The goal is not a perfect photo. The goal is a simple setup that still works when you are cooking, cleaning, and moving through the space.
This post is built around one easy fix: the triangle setup that keeps it tidy. It gives you a clear spot to prep and a small, calm cluster that looks nice without taking over the whole surface.
You will learn what three items to use, where to place them, and how to keep the island from turning into a clutter zone again. There are also quick ideas for small islands, open plan kitchens, and budget friendly styling using what you already have.
Table of Contents
What the triangle setup is and why it works
The idea in one line
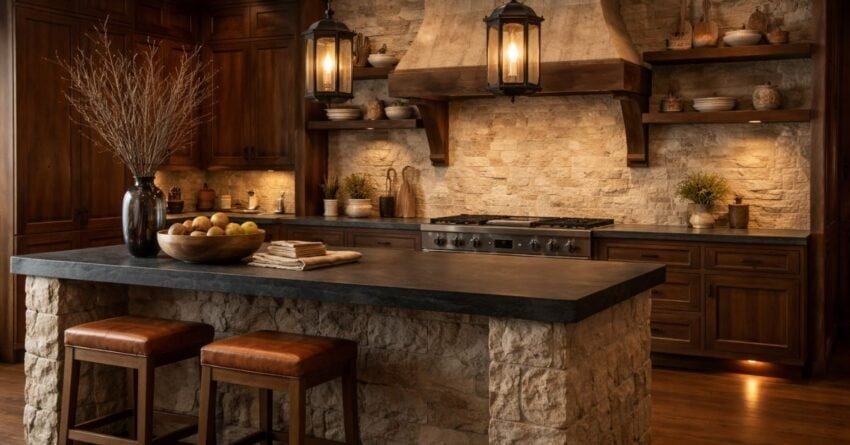
The triangle setup is a tidy cluster of three items placed in a triangle shape on one end of the island, with the rest of the surface left open for real use.
Think: one taller item, one medium item, and one low item. Three heights. Three points. One calm corner.

Why it keeps the island tidy
Most clutter starts because the island has no “home base.” So everything lands anywhere.
A triangle setup fixes that by giving the island one clear zone that holds the daily stuff, while the rest stays open.
It also helps because:
- You only style with three items, so it is harder to overfill the surface
- Cleanup is fast since the setup lifts as one group
- The items can be useful, not just decorative
Martha Stewart shares a similar idea with height and everyday pieces, like tall branches in a vase and a footed bowl to give items a bit of lift, which helps the island feel more put together without adding more stuff.
The triangle setup in real life
On a busy weekday, the triangle setup still works because it is not spread across the island.
It stays to one side. It leaves room for:
- chopping and plating
- kids doing homework
- unpacking groceries
- setting out snacks
Ideal Home also points out that the island looks better when it is edited, with fewer pieces and more breathing room, instead of filling the whole surface.
Start by picking your three anchors
Anchor 1: A tall item that adds height
This is the piece that makes the island feel awake, even on a normal day.
Good options:
- a simple vase with tall branches or leafy stems
- a clear glass bottle with a few long greens
- a slim pitcher that can also hold utensils when you cook

Anchor 2: A bowl or tray that gathers the small stuff
This is the tidy helper. It keeps little things from spreading out.
Good options:
- a fruit bowl
- a footed bowl
- a tray that holds salt, pepper, and a small dish
Martha Stewart also notes that a bowl on a base gives items a lift and makes everyday things feel more planned. The same source also mentions corralling items in a tray or basket so the group feels pulled together.

Anchor 3: A low item that adds warmth
This piece brings the triangle down to the surface so it feels grounded.
Good options:
- a wood cutting board leaned flat
- a folded linen napkin
- a shallow dish for rings or keys
Keep this one low and calm. If it gets bulky, it steals your work space.
Insert image showing a cutting board paired with a small bowl and a tall vase here
Quick check before you place anything
Before you set your three anchors down, ask one question:
Where do hands need to work most of the day?
Pick the opposite end for your triangle setup. That is how it stays tidy.
How to place the triangle setup so it stays out of the way
Pick the quiet end of the island
Most islands have a “busy end” and a “quiet end.”
The busy end is where:
- groceries land
- chopping happens
- kids sit
- you slide plates over during dinner
The quiet end is usually closer to a wall side, or the side farthest from the stove sink path. That is where your triangle setup should live.
When the styling is parked in one spot, it stops getting pushed around all day.
Keep sightlines clear in open plan kitchens
If your island faces the living room or dining area, keep the setup lower and tighter.
A few tips:
- keep the tallest item toward the back, not the front edge
- avoid wide arrangements that block the view across the island
- stop at three pieces, then leave space
Ideal Home points out that the island looks better when it is not overfilled, and it often helps to place the styling to one end so it does not get in the way.
Copy this simple placement
Here is the easiest triangle layout to follow.
- Place the tall item at the back corner of your chosen end
- Place the bowl or tray slightly forward and closer to the center
- Place the low item beside the tray, angled a little
You now have three points that feel connected, without spreading out.
Small detail that helps: keep the tray or bowl closest to where your hands naturally reach. That is what makes the setup feel useful, not fussy.
Kitchen island styling ideas for a tidy everyday setup
The breakfast and coffee version
This setup works when mornings feel rushed and the island becomes the landing spot.
Use your triangle like this:
- Tall item: a simple vase with a few stems at the back
- Medium item: a bowl for fruit or a tray for two mugs
- Low item: a wood board or folded linen to soften the surface
Ideal Home mentions that fruit and veg can work as simple accessories, which fits this morning setup well.

The cooking heavy version
If you cook most days, your island needs a clear lane.
Keep the triangle tight and useful:
- Put the tray or bowl closest to the edge so it is easy to move
- Keep the tall item pushed back so it is not in the way
- Use the low item as the base that stays put
The family drop zone version
This is the one that saves the island from becoming a pile.
Keep the triangle setup, then add one rule: everything that lands on the island goes into the tray or bowl.
Try this layout:
- Tall item stays the same
- Tray becomes the landing spot for keys, mail, and small items
- Low item stays simple so the tray does not feel crowded
If the tray fills up, it is a sign the island needs a quick reset, not more decor.
A fast daily reset that takes two minutes
- Put loose items into the tray
- Clear anything that does not belong in the kitchen
- Wipe the open lane
- Put the three anchors back in place
Once you do this a few times, the island starts to stay tidy on its own because it has one clear home base.
Budget friendly kitchen island styling ideas using what you own
Use fruit, boards, and everyday dishes on purpose
You do not need new decor to make the triangle setup feel neat.
Start with what is already in your kitchen:
- a fruit bowl or a simple serving bowl
- one wood cutting board
- a small dish that can hold rings or tea bags
- a tray you already use for snacks
Martha Stewart also leans into the idea of using useful items that still look good, plus grouping them in a tray or basket so the island feels pulled together.

Pantry and thrift swaps that still feel calm
If you want a change without spending much, swap one anchor at a time.
Easy swaps:
- replace the tall stems with something from your yard
- switch the bowl shape from wide to footed if you have one
- swap the low item from board to folded linen, or back again
The goal stays the same. Three pieces. Three heights. One quiet end of the island.
A five minute reset routine that keeps it tidy all week
This routine works best at the same time each day, like right after dinner.
- Clear anything that does not belong in the kitchen
- Empty the tray or bowl of random items
- Wipe the open prep lane first
- Put the three anchors back in their triangle spots
- Stop there
Here is a quick cheat sheet you can follow.
| Item | Why it helps | Where it goes when you cook |
|---|---|---|
| Tray or bowl | Holds small items in one spot | Lift it to the table or counter |
| Tall vase or stems | Adds height without taking work space | Push it to the back corner |
| Cutting board or linen | Makes the setup feel grounded | Slide it flat or store it upright |
Kitchen island styling ideas for small or narrow islands
The slim triangle setup
When the island is tight, the triangle still works. It just gets lighter.
Use:
- one tall item at the back corner
- one bowl or tray in front
- skip the third anchor if it crowds the surface
If you want three points, make the low anchor very thin, like a folded linen or a small board that sits flat.

Use compact and movable pieces
Small islands need breathing room. If the items are easy to lift, the island stays useful.
Small kitchens can still have style, and one smart option is using a smaller island piece like a console style surface when space is tight.
That same idea works for styling too. Keep the setup light so you can clear it fast.
One thing that makes small islands feel messy fast
Too many small items.
In a small space, lots of little pieces do not read as cute. They read as clutter. The fix is simple: one bowl or tray that holds the small stuff, and one tall item for height. Then stop.
Try this quick test:
If you cannot wipe the island in one smooth pass, there is too much on it.
Make the island stand out in an open plan space
Keep the top calm and let the base do more
In an open plan kitchen, the island is seen from many angles. A busy countertop can feel loud fast.
A simple move is to keep the top mostly clear, then let the island itself carry the “wow” through finish and color:
- a darker island base than the cabinets
- a wrapped stone look
- a two level island that separates prep from seating
Clearview Kitchens shares examples where the island becomes the kitchen center point through bolder materials and shapes, while still staying useful for cooking and hosting.

Repeat small details across the kitchen
If the room feels a bit random, repeat one or two details so it feels tied together.
Easy repeats:
- match metals (like the faucet and the bowl)
- repeat wood tone (board matches stools or shelves)
- repeat one color (linen echoes cabinet color or tile)
Using similar materials for accessories helps the island feel more put together, without adding more items.
Use one larger item, not many small ones
A common reason an island looks messy is too many tiny objects spread out.
Try this instead:
- keep your triangle setup
- make the bowl or tray the main item
- keep everything else simple and low
It is easier to clean, and the island reads as calm from across the room.
Lighting over the island that helps both work and mood
What lighting does for styling
Even a tidy triangle setup can look flat if the light is harsh or dim.
Good island lighting does two simple things:
- helps you see what you are doing when you prep food
- makes the island feel warm in the evening, not like a workbench

Pendant height and spacing basics
Pendant lights look nicest when they light the surface without shining right into your eyes.
A simple way to check:
- sit on a stool and look forward
- if the bulb is in your line of sight, it will feel annoying fast
- if the light is too high, the island can feel shadowy
If you have a long island, two or three pendants can look cleaner than one tiny pendant floating alone. If your ceiling is low, a semi flush light can feel less heavy.
Warm bulbs and layered light
If you want the island to feel calm at night, warm bulbs help.
Try this combo:
- brighter light for cooking time
- softer light for evenings
A dimmer is a simple add if you already have overhead lights. It lets the island shift from busy daylight mode to a softer glow later on.
If you are planning an island, these basics affect styling
Clearance around the island
If the walkways feel tight, the island top gets messier. People squeeze past, items get bumped, and decor gets pushed into a pile.
A good rule is to leave enough space so two people can pass without turning sideways. Houzz notes a minimum of about 39 inches of circulation space around an island.
Tom Howley also talks about mapping the walkways first and adjusting island size when the area is high traffic so the room feels more comfortable.

Island height for seating vs prep
The height changes what belongs on top.
- Prep focused island: you will want more open surface, so the triangle setup stays smaller and pushed to one end
- Seating focused island: you need clear sightlines and fewer items near where people sit, so stools do not bump decor
Even if you keep the same three anchors, the placement shifts. Seating zones do better with low pieces and tighter grouping.
Adding a sink, cooktop, or dishwasher
When an island has appliances, styling needs to stay out of the splash and heat zones.
A simple way to handle it:
- keep the triangle setup on the dry end of the island
- avoid paper items near a sink
- avoid tall stems near a cooktop where grease and heat can reach
Cuisines Rochon suggests starting with the island’s main function first, then planning details like storage, outlets, water points, and more. That planning affects how much clear space you will really have for styling.
Common kitchen island styling mistakes that cause clutter
Too many small items
This is the fastest way for an island to look messy.
A few tiny candles, a small plant, a mini sign, a little dish, and a stack of coasters can feel like a jumble. It also takes longer to wipe the surface, so things start to stay put.
Ideal Home warns that the island looks better when it is not overfilled, and that one stronger item can work better than lots of small ones.
Quick fix:
- keep the triangle setup
- make the bowl or tray the main piece
- remove the extra small items
Putting decor in the main prep lane
If decor sits where you chop and plate, it will get pushed around. Then it becomes a pile.
Quick fix:
- move the triangle setup to the quiet end
- keep the center lane clear for work
- if you need a decor moment, do it on the far end, not the middle
Choosing pieces that clash with the rest of the kitchen
When finishes do not match, the island can feel off even if it is tidy.
Quick fix:
- repeat one metal finish you already have
- repeat one wood tone you already have
- keep the triangle setup pieces in similar tones
Here is a quick cheat sheet for the most common problems.
| Mistake | Why it happens | Quick fix |
|---|---|---|
| Too many small items | It feels like you need more decor | Use one tray and one tall item, then stop |
| Decor in the work zone | You styled the center first | Move styling to one end |
| Random colors and finishes | Items were bought one by one | Repeat metals and wood you already have |
| No “home base” | Everything lands anywhere | Make the tray the landing spot |

Simple seasonal swaps that keep the triangle setup tidy
One swap per anchor, not a full redo
Seasonal decor gets messy when it adds extra pieces instead of swapping.
Keep your triangle setup, then switch only one thing per anchor:
- Tall item: change the stems
- Bowl or tray: change what sits inside
- Low item: change the linen color or texture
This keeps the island easy to clear when you need to cook.
Easy seasonal ideas that stay calm
Keep it simple. No piles. No extra layers.
Winter
- evergreen stems or bare branches in the vase
- citrus in the bowl for color
- a thicker linen folded flat
Spring
- light green stems or simple florals
- a bowl of pears or apples
- a lighter linen in a soft tone
Summer
- a clear vase with airy greens
- a bowl of lemons or limes
- a woven napkin or simple cloth
Fall
- dried stems or warm toned branches
- apples or mini squash in the bowl
- a warmer linen tone
What to skip so it does not feel crowded
A few things tend to cause clutter fast:
- lots of tiny seasonal items spread around
- signs and mini props that take up space
- anything that blocks the prep lane
If the triangle setup is working, you do not need more. Just swap the filler and move on.

Frequently Asked Questions
1) How much clearance do you need around a kitchen island so it feels comfortable to move and work?
Many kitchens feel best with about 39 inches of walking space around the island as a starting point. More space helps if two people pass often or if appliance doors open near the island. Houzz shares this minimum spacing idea and why it matters for comfort.
2) What is the ideal height for a kitchen island with seating versus one used mainly for prep?
Prep focused islands are usually counter height, while seating islands are often taller so stools fit better. Your best height depends on how you use the island most days. If seating is a big part of the island, keep the styled items farther from where knees and elbows bump.
3) Can you put a sink, cooktop, or dishwasher in a kitchen island, and what should you consider if you do?
Yes, you can, but it changes how you use the top. Plan for outlets, water, and storage early so the island stays easy to work around. Cuisines Rochon highlights starting with the island function first, then planning details like utilities and smart storage.
4) What type of lighting works best above a kitchen island for both task work and ambience?
Island lighting works best when it brightens the surface for prep, then softens for evenings. Pendants can work well when they do not shine in your eyes and do not block views across the room. If you can add a dimmer, it helps the island shift from cooking time to a softer mood.
5) How do you style a kitchen island without making it look cluttered?
Use the triangle setup on one end, then leave the rest open. Stick to three anchors and use a tray or bowl to hold small items so they do not spread. Ideal Home also notes the island looks better when it is not overfilled. https://www.idealhome.co.uk/kitchen/kitchen-decor/rules-for-styling-a-kitchen-island
6) What are some budget friendly ways to decorate a kitchen island using fruit, cutting boards, or everyday dishes?
Start with what you already own: a bowl of fruit, one wood board, and a simple vase with stems. Keep it useful so you are not moving lots of decor when you cook. Martha Stewart shares ideas like adding height with branches and using trays or bowls to group everyday items.
7) How do you style a small or narrow kitchen island so it still looks modern and neat?
Go smaller and leave more open space. A tall vase plus a small tray is often enough, and you can skip the third piece if the surface feels tight. Martha Stewart also shows that compact island choices can still look great in tiny kitchens.
8) How do you make your kitchen island the focal point of an open plan space?
Keep the countertop calm, then let the island base or finish stand out more than the decor on top. A bolder island material or color can carry the main visual weight while your triangle setup stays simple. Clearview Kitchens shares examples where the island becomes the main feature through materials and shape.
9) How do you coordinate island materials and accessories with the rest of the kitchen for a cohesive look?
Repeat what you already have, like the same metal finish as the faucet, or the same wood tone as shelves or stools. Keeping the accessories in similar tones helps the island feel like it belongs. Houzz also mentions picking island materials that work with nearby rooms.
10) What are the most common mistakes when planning or styling a kitchen island, and how can you avoid them?
The big ones are tight walkways, too many small items, and decor placed in the main prep lane. Plot the traffic flow first so the space feels comfortable, then keep styling to one end. Tom Howley talks about planning walkways early, especially in high traffic kitchens.
Conclusion
A kitchen island can look nice and still work hard every day. The trick is keeping the styling small, useful, and parked on one end.
That is why the triangle setup works so well. Three anchors, three heights, and one clear lane for real life. It is easy to wipe down, easy to reset, and it keeps the island from turning into a daily pile.
If you try one thing this week, try this: pick your quiet end, set your three anchors, and let the rest stay open. After a few days, the island starts to feel easier to live with.
Quick recap
- Use three anchors: tall, medium, low
- Place them on one end, not in the middle
- Use a tray or bowl as the landing spot
- Keep the rest clear for prep and daily life
- Swap seasonally by switching one anchor at a time
If you want more simple ideas that make a kitchen feel fresh without a big change, read Kitchen and Dining Decor: The Small Styling Tweaks That Made My Space Feel Brand