Open kitchen shelves look amazing in photos. Then real life walks in. A new mug shows up. A cereal box gets parked “for now.” A stack of plates leans a little too far left. Suddenly your shelves feel loud, even if the kitchen is clean.
If you searched for kitchen shelf styling ideas, you are probably trying to kill the too busy look without buying a bunch of new decor. That is the goal here. You will learn what to keep, what to store, and how to space items so the shelf wall feels calm and easy to live with.
This same calm layout idea also works on counters. You might like a tidy triangle setup for kitchen surfaces and dining decor tweaks that feel brand new.
Table of Contents
Why shelves start feeling too busy
The biggest trigger is trying to fill every inch
Most shelves start out fine. Then we keep adding “one more thing” until the shelf has no breathing room.
A simple fix is to stop treating empty space like a problem. Leave breathing room between objects so shelves feel calm.
Quick shelf check:
- If items touch each other, remove one
- If a shelf has more than 5 to 7 items, pull off 2 and reassess
- Keep a small gap between groups so your eye can rest

Too many colors and mixed finishes create visual noise
Sometimes it is not the amount of stuff. It is the mix. Bright packaging, shiny pieces, and random colors make the shelf look scattered.
A calmer shelf starts with a tighter palette. Use a limited color palette and mix shapes and heights for a cohesive shelf.
Try an easy palette that works in most kitchens:
- Warm white and wood as the base
- One accent finish like matte black or brass
- Clear glass in one spot only, like one shelf
Function gets ignored, so items land wherever they fit
When shelves are styled first and used second, they turn into a landing zone. The calmer look comes back when the layout follows how you cook and grab things daily.
Start by separating needs from wants. Plan your shelf layout around what you need versus what you want.
A quick example: keep daily plates and bowls on the lowest shelf you can reach, then style the shelf above it with smaller groups.
Start with a simple reset that takes 10 minutes
You do not need to restyle every shelf today. You just need a quick reset that clears the noise, then puts back only what earns its spot.
Step 1 Pull everything off one shelf only
Pick the shelf at eye level first. Set a timer for 10 minutes and clear it completely.
Make three piles on the counter:
- Use daily
- Use sometimes
- Do not belong here
Common mistake: trying to fix a busy shelf while everything is still sitting on it. The shelf will look “fine” for two minutes, then slide back into chaos.

Step 2 Choose one color story before you put things back
This is where shelves start to look calm fast. Pick 2 to 3 main colors and repeat them across the shelf wall.
A helpful trick is to pull colors from one inspiration item, like a small framed print or a dish you already love. Layer textures and repeat colors for one clear color story.
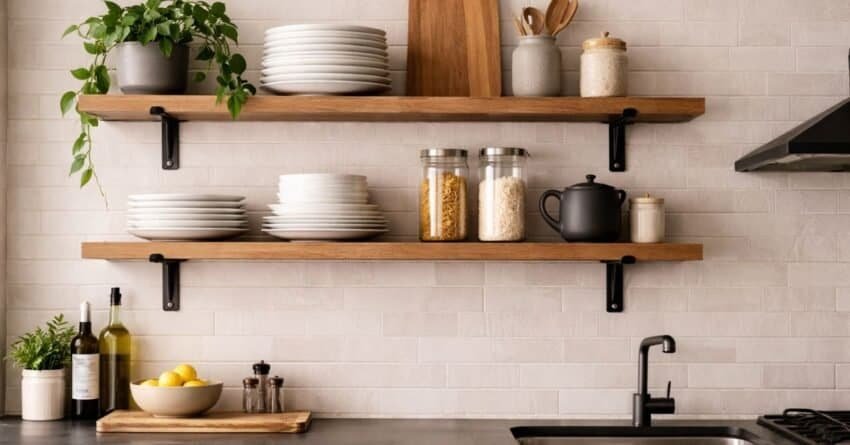
Micro example: white stoneware, warm wood, and clear glass, with one small matte black accent.
Step 3 Put back function first, then add one small styled group
Start with the daily items you reach for. Keep them on the lowest shelf you can grab without stretching, and keep heavier stacks closest to the brackets.
If you cook a lot, this helps you stay tidy because you are not moving decor every time you need a bowl. Keep everyday dishware on lower shelves for easy access.
Then add one small styled group on the same shelf, to one side. Think: a stack of plates, a small bowl, and one cutting board leaned behind for height.

Small space variation for tight shelf runs
If your shelves are short, go lighter. Use two groups per shelf, not four.
A simple layout that works in small kitchens:
- Left side: stacked plates plus one small bowl
- Right side: one canister plus one leaned board
Leave a clean gap between them so the shelf does not feel packed.
Budget option that still looks pulled together
Before you buy anything, shop your own kitchen. One matching stack of bowls and one wood board already does a lot.
If you want to add something, swap in one thrifted or big box bowl that matches your palette, then repeat it once. That repeat is what makes it feel planned, not random.
The spacing rules that kill the too busy look
This is the part that changes everything. You can keep most of your items, but spacing is what makes shelves feel calm.
Use the one third rule for empty space
A simple way to check yourself is this: on each shelf, aim for about one third empty.
That empty space can be one clean gap in the middle, or a few smaller gaps around groups. The goal is for each group to have room to breathe.

Keep shelves in 2 to 3 groups, not 6 mini piles
Most shelves look busy because they have too many little clusters. Try this instead.
Shelf layout that works in most kitchens:
- One stack, like plates or bowls
- One vertical lean, like a cutting board or small frame
- One small container, like a canister or jar
If you already have dishes on the shelf, that counts as the main group. Do not add more tiny things around it.
Build depth with a back row and front row
Depth makes shelves look styled without adding more items.
Use this simple placement:
- Back row: taller or flatter pieces leaned or set back
- Front row: one bowl or one canister, centered in front of the back row
- Keep the front row low so it does not block everything behind it
Height and shape rule that keeps shelves balanced
On each shelf, mix only two height levels. One tall or medium piece, then mostly low pieces.
A quick example:
- Medium: a pitcher or vase
- Low: stacked bowls, a canister, a small tray
Skip the extra tall stems if they make the shelf feel crowded.
A fast spacing table you can follow
| Shelf issue | What it looks like | Simple fix |
|---|---|---|
| No empty space | edge to edge items | remove 2 items and add one clear gap |
| Too many mini groups | lots of tiny clusters | keep 2 to 3 groups per shelf |
| Flat layout | everything in one line | add back row and front row depth |
| All one height | same size items only | add one medium piece, keep the rest low |

What to put on open shelves so they stay useful
Pretty shelves are nice. Useful shelves are what keeps the wall from turning busy again two days later.
A simple mix that works in real kitchens
Try this ratio as a starting point:
- About 70 percent everyday items you use often
- About 30 percent “nice to look at” items that still make sense in a kitchen
Everyday items can still look great. Think stacked plates, nested bowls, and glasses that match your color story.
Shelf staples that look good and get used
These are the items that usually read calm on shelves because they are simple shapes:
- Stacked plates in one size
- Nested bowls in one tone
- Glassware kept in one section
- One or two canisters for sugar, tea, or coffee
- A cutting board leaned at the back for height
- One small basket to hide loose packets
Micro tip: keep labels turned away or use one jar style so the shelf does not look noisy.
Decor that helps, not decor that crowds
If you want a little decor, choose items that still feel at home in a kitchen:
- A small framed print
- A simple pitcher or vase
- A bowl that could hold fruit
- One cookbook stack only if you use it
Keep it to one “extra” item per shelf. If you add three, it starts reading like a store display.

What to skip if you want the too busy look gone
These are the usual troublemakers:
- Lots of tiny knickknacks
- Loud packaging and bright labels
- Too many patterns at once
- A different mug style on every shelf
- Random items that do not belong in the kitchen
If you love mugs, keep them in one matching group and store the rest in a cabinet.
If you cook a lot, place shelves like a real person lives there
Put your most used items on the lowest shelf. Keep anything that shows grease or dust away from the cook zone if you can.
A simple layout that stays easier to live with:
- Lower shelf: daily bowls and plates
- Middle shelf: glasses and one canister group
- Top shelf: lighter items you do not grab every day
Layout ideas for small kitchens and tight shelf runs
Small kitchens get the “too busy” look fast, because every inch has to work. The trick is to keep the styling lighter, not louder.
If your shelves are short, use a two group layout
For short floating shelves, skip the extra layers. Use two groups with a clear gap.
Simple layout:
- Group 1: stacked plates plus one small bowl
- Group 2: one canister plus one leaned cutting board
Leave a clean gap between the two groups.

If your shelves are long, anchor the ends and keep the middle calm
Long shelves can start looking like a yard sale if everything is spread evenly. Try anchoring the ends.
Easy long shelf plan:
- Left end: one medium height piece plus a stack
- Middle: one open gap
- Right end: one canister group
This keeps the shelf from feeling packed across the whole length.
If your shelf wall is right above the counter, avoid “double clutter”
When shelves sit close to a countertop, both surfaces compete. Keep the counter calmer than the shelves, or the shelves calmer than the counter.
Quick rule: if the counter holds appliances, keep the shelf styling very light. If the counter is clear, you can keep one extra group on the shelf.
Small space “one hero per shelf” rule
In tight spaces, pick one hero item per shelf. Everything else should be simple and low.
Examples of a hero item:
- a pitcher
- a big bowl
- a framed print
Then use one stack of plates or bowls to support it and stop there.
Budget tip that works especially well in small kitchens
Matching sets read calmer than mixed pieces. If your dishes are all different, group them by color so the shelf still looks planned.
A quick budget move: keep one shelf all white dishes, even if they are thrifted. That one shelf alone can make the whole wall feel less busy.

Style direction choices that keep shelves from looking random
This is where shelves go from “stuff on a board” to “calm and pulled together.” You only need one clear direction, then repeat it.
Modern shelf styling that still feels warm
Modern shelves look best when shapes are simple and the palette is tight.
Try this mix:
- warm white dishes
- one or two wood pieces like cutting boards
- one matte black accent, like a pepper mill or small frame
Keep the decor low and let the empty space do the work.
Minimal shelf styling that does not feel bare
Minimal does not mean empty. It means fewer items, stronger groups.
A good minimalist shelf usually has:
- one stack
- one container
- one lean
Then one clear gap.
If you want more texture, add a woven basket or stoneware canister, not more small objects.
Color control that keeps the too busy look away
If you are not sure where to start, pick one main neutral and one accent.
A calm color plan:
- Base: warm white, cream, or soft gray
- Accent: wood, then one metal finish like brass or black
This keeps the shelf from looking like a mix of random items.
Matching shelf decor to countertops and backsplash
This is a smart tweak, and it keeps shelves from feeling like a different room.
Look at your backsplash and countertop first. If your backsplash has movement like stone or tile variation, keep shelf items simpler. If your backsplash is plain, you can add a little more texture on the shelf.
Small example: creamy stone backsplash, then use matte ceramics and warm wood, not shiny glass everywhere.
Plants without the chaos
Plants can calm shelves, but too many small pots reads busy.
Use one plant per shelf wall, not one plant per shelf. One trailing plant on the top shelf, or one small olive stem in a vase, is usually enough.

Maintenance for real kitchens: dust, grease, and staying tidy
Open shelves can look great long term, but only if the setup matches how you cook. The goal is simple: less stuff on the shelf, and easier surfaces to wipe.
The easy dust routine that keeps shelves looking clean
If shelves are open, dust shows up faster than on closed cabinets. A small routine beats a big deep clean.
Try this simple rhythm:
- Once a week: quick wipe of the shelf board and the front of items you touch most
- Once a month: pull off everything from one shelf and wipe it fully
- After heavy cooking: wipe any shelves near the stove the same day
Open shelves need regular wipe downs to prevent dust buildup.
Grease control if you cook a lot
If your shelves sit near the cooktop, the air carries grease and it sticks to objects. That sticky film is what makes shelves look dull and busy over time.
Two small placement moves help a lot:
- Keep open shelves farther from the cook zone if possible
- Put everyday dishes on lower shelves, and keep decor higher or farther away
Avoid too many materials and random containers since they add visual noise.
What to choose so wiping is fast
Pick items that clean easily and do not trap dust.
Good shelf materials and items:
- glazed ceramic and stoneware
- glass in small doses
- sealed wood boards
- lidded canisters for loose food items
Avoid deep baskets right next to the stove. They grab grease fast.
How to clean shelves without turning it into a whole project
You do not need anything fancy. A gentle degreasing wipe is usually enough, just like you would do on cabinet fronts.
Clean open shelves like cabinet fronts and gently degrease as needed.
Micro tip: keep a small tray on the counter for “shelf swaps.” If you bring in a new mug or jar, it sits there first. Once a week, decide if it earns a shelf spot.

Mistakes that make shelves look too busy and how to fix them fast
If your shelves keep looking messy, it is usually one of these mistakes. The fixes are quick and you can do them in one coffee break.
Mistake 1 Too many tiny items
Small things add up fast. A shelf full of minis reads like clutter, even when it is clean.
Fix: swap tiny items for one larger anchor. One big bowl looks calmer than five little bowls.
Mistake 2 Every shelf looks the same
When each shelf has the same layout, your eye stops seeing structure and starts seeing a wall of stuff.
Fix: vary the shelf “job.”
- One shelf is for dishes
- One shelf is for glassware
- One shelf is for canisters and one decor piece
Leave at least one clear gap on every shelf.
Mistake 3 No clear color plan
Random colors, loud packaging, and mixed finishes create visual noise.
Fix: turn labels away, decant dry goods into matching jars, and repeat one metal finish. A tight palette makes even budget items feel calm.
Mistake 4 Stuff that does not belong on shelves
Mail, tools, spare cords, and random kitchen gadgets will always make shelves look busy.
Fix: keep a small basket or lidded box on the counter for those items, not on the shelf. The shelf should hold kitchen items you use or enjoy seeing.
Mistake 5 Filling every inch
This one is the biggest. When shelves are packed edge to edge, they look loud.
A calm shelf needs breathing room. Leaving negative space keeps open shelves from feeling crowded.
Fix: remove two items per shelf and add one clear gap. That is the fastest reset.

A simple shelf styling formula you can copy in any kitchen
If you want shelves that look calm every day, use the same repeatable setup on each shelf. It keeps you from adding random extras.
Step 1 Pick one shelf job at a time
Before you place anything, decide what the shelf is for.
Pick one:
- Daily dishes shelf
- Glassware shelf
- Pantry jar shelf
- Decor and cookbooks shelf
This stops the “everything everywhere” look.
Step 2 Start with one anchor group, then stop
Your anchor group is the main thing on that shelf.
Easy anchor groups:
- stacked plates plus nested bowls
- a row of pantry jars in the same shape
- one big serving bowl with a small stack beside it
Keep it to one anchor group per shelf.
Step 3 Add one height piece, then keep the rest low
One height piece makes the shelf feel finished. More than one starts to look busy.
Good height pieces: a pitcher, a vase, a tall canister, a framed print leaned at the back.
Keep your color palette tight so the height piece does not shout. Limit your palette and mix heights for a calmer.
Step 4 Add depth with one lean behind the anchor
Depth makes shelves feel styled without adding more stuff.
Use one of these behind the anchor group:
- cutting board
- small framed art
- cookbook laid flat or stood up with the spine turned in
Odd numbered groupings and layering are a simple way to keep it balanced. Group items in odd numbers and layer pieces for depth.
Step 5 Leave one clean gap on every shelf
A gap is not wasted. It is what makes the shelf feel edited.
Quick check: if you cannot see the shelf board at all, it is too full. Pull two items out and create one clear gap.
One quick example you can copy today
Try this on one shelf:
- Back row: one leaned cutting board plus one small frame
- Front row: one stack of plates plus one nested bowl
- Side: one lidded canister
- Gap: one clear space between groups
That is it. When you feel tempted to add more, add space instead.

Budget shelf styling ideas that still look calm
You do not need a full shelf makeover to calm things down. You just need fewer item types, repeated shapes, and a little space.
Start by shopping your own kitchen first
Before you buy anything, pull out what you already have and group it by type.
A quick reset that costs nothing:
- all plates together
- all bowls together
- all glasses together
- one shelf for jars or canisters only
This is also where it helps to use pieces that are both useful and nice to look at. Use everyday dishes that look good as part of the shelf display.
Pick one “hero” material and repeat it
Mixing materials can look great, but too many finishes reads busy.
Choose one main material to repeat across shelves:
- warm wood
- matte ceramic
- clear glass
Then add just one accent finish like matte black or brass.
Thrifted items can look high end when you group them
Thrift finds look random when they are spread out. They look planned when they are grouped.
Simple trick: keep thrifted pieces in one tone on one shelf, like all white stoneware, or all clear glass.
Use one piece of art or one cutting board for “style”
If shelves feel flat, you do not need more objects. You need one vertical element.
Pick one:
- a cutting board leaned at the back
- a small frame leaned behind a stack
- one cookbook spine turned in
Then stop. That one move adds depth without filling the shelf.
The cheapest way to make shelves feel less busy
Remove two things.
It sounds too simple, but it works. Pull out the smallest items first, then add one clear gap. Your eye will read the shelf as calm again.

Frequently Asked Questions
1) How do you style kitchen shelves without making them look cluttered?
Start by pulling everything off and putting back only what you use or truly like seeing. Build simple groups, then leave a clear gap on every shelf so your eye can rest. If a shelf looks busy, remove the smallest items first.
2) How much empty space should you leave on open kitchen shelves?
A good rule is to leave at least one clear gap on each shelf, about the width of a dinner plate or a small stack of bowls. You should still see some of the shelf board. If every inch is filled, it will read loud even if it is tidy.
3) What should you actually put on open kitchen shelves, decor vs everyday dishes?
Lead with everyday dishes you reach for often, like plates, bowls, and glasses. Then add one small extra item per shelf, like a pitcher, a simple vase, or a cutting board leaned at the back. When you keep it mostly practical, it stays calm longer.
4) How do you mix function and decor on kitchen shelves in a small space?
Pick one shelf as the work shelf with daily dishes, then keep the next shelf lighter with one decor item and one small stack. Small kitchens do better with fewer item types and bigger groups. If you want a simple visual rule that also works in kitchens, the idea behind a triangle setup that keeps an island tidy can help you group shelf items too.
5) What colors work best for modern kitchen shelf styling?
A tight palette looks best, like warm whites and soft grays with wood. Add one accent only, like matte black or brass, then repeat it once or twice. Too many bright labels and mixed patterns is what makes shelves feel busy.
6) How do you arrange items by height and shape so shelves look balanced?
Use one taller piece per shelf, then keep the rest low. Put the taller item near the back and one side, then place a stack in front and leave a gap nearby. If you have two tall items, split them across different shelves so the wall does not feel top heavy.
7) How often should you clean or dust open kitchen shelves, and how?
A quick wipe once a week keeps shelves from looking dull. A deeper wipe once a month helps if your kitchen gets a lot of use. Keeping fewer items on the shelves makes cleaning much faster.
8) Are open kitchen shelves practical if you cook a lot, dust, grease, maintenance?
They can be, but placement matters. Keep shelves farther from the cook zone when you can, and store daily items lower so you can grab them and wipe the shelf easily. If your stove runs hot and you fry often, lighter styling will look better over time.
9) What are the biggest mistakes people make with open shelving layout and organization?
The biggest ones are filling every inch, mixing too many colors, and spreading tiny items across all shelves. Another common issue is using shelves as a drop zone for mail and random kitchen gadgets. Fix it by giving each shelf one job and leaving space.
10) Can you style kitchen shelves on a tight budget using big box or thrifted finds?
Yes. Group thrifted pieces by color and shape so they look planned, not random. A single shelf of mostly white dishes or clear glass can look calm even if every item came from a different place. Spend your budget on one or two larger anchors, not lots of small extras.
Conclusion
Kitchen shelf styling ideas work best when you treat shelves like a simple display, not a storage race. Pick one shelf job at a time, build one strong group, add one height piece, then leave a clean gap so the wall can breathe.
If your shelves still feel too busy, do this today: remove two small items per shelf, turn labels to the side, and keep one clear space the width of a dinner plate. That quick reset is usually the difference between cluttered and calm.
Want an easy refresh that makes the whole room feel new? Read Kitchen and Dining Decor: The Small Styling Tweaks That Made My Space Feel Brand New